Photographer’s Corner: To Retouch or Not to Retouch, by Lori Smith
December 6th, 2012
 Lori Smith has almost 25 years of experience as a photographic artist for Miller’s Professional Imaging/Mpix. She holds both Master Artist and Master of Electronic Imaging degrees from the Professional Photographers of America. She also has earned the APAG degree from the American Photographic Artist’s Guild. She has earned numerous national and state awards as well and has been published in Professional Photographer Magazine and several PPA Loan Collection books.
In the following article, Lori has agreed to share some of her experience and wisdom from her many years as a digital artist and retoucher. Zenfolio would like to thank Lori for the work she has put into this article. We love to learn from the best and are happy to share her expertise.
To Retouch or Not to Retouch – By Lori Smith
The Basics
The topic of retouching photos can invoke a myriad of opinions. While the photography world has many facets, each with their own views on what is or is not allowed as far as retouching goes, I will address the portrait photographer here. Though there will always be a difference in opinion as to what should or should not be retouched, or to what level, I recommend that you look to what was done before digital cameras came along and use that as a foundation and starting point.
The basics were the removal of blemishes, scratches, bruises, the softening of eyebags, wrinkles and deep smile lines, and neutralizing redness in the face. You might also do removal or softening of moles, stray hairs, and facial shine if requested by the customer. Most of this was done by trained negative retouchers and positive print finishers would blend any retouching that needed it after the photo was printed. The goal was not to change anything unnesessarily, leaving as much of the unretouched photograph as possible to keep the subjects character and skin texture, thus avoiding the possibility of changing the subjects likeness too much.
The Digital Revolution
Now that Digital has come along, with it’s millions of ways to change, alter and edit an image, everyone has their own idea what, why and how to retouch. I choose to start with my foundation, recommended above, and combine those virtues with digital options to meet a happy medium that encompasses the best of both digital and film worlds. The digital options I can now include are softening skin texture, adding a soft focus filter, selective color adjustments to neutralize color casts, softening, removing or blending shadows. While most anything could have been done on the print with traditional artwork on the print itself, digital artwork can be done with a more realistic outcome.

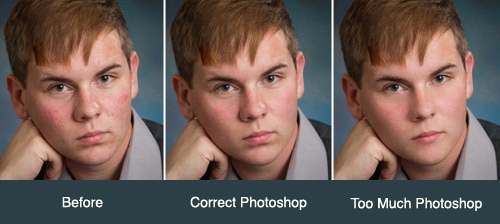
For the professional portrait photographer, skillful retouching can set you apart from the soccer mom or weekend photo warrior. Customers need to trust that their portraits will make them look amazing, while still retaining their likeness, which is not always the outcome from a hobby photographer. The goal is for the retouching to be just enough, not overdone, and so subtle that it’s not apparent what all was done to it. You want them to look at themselves and think, “Wow, I looked really good that day!” Likewise, just because you can retouch or remove something doesn’t mean you should. Knowing what to retouch is just as important as knowing what to leave alone. It’s extremely easy to overdo it.
Getting Started
For those beginning to try their hand at retouching, there are countless tutorials online professing different retouching methods. Be careful not to take the first tutorial you find as the Holy Grail. Many of them consist of simply blurring the skin area. Blemishes are not miraculously removed this way, but just look spread out, mushy, and still there. One thing I know, a person should not look like their face is melting! There are many good tutorials out there, so keep looking, experiment, and compare. A few places you might consider beginning are Photoshop Café or the National Associaiton of Photoshop Professionals (NAPP) webage. Both offer training, both online and in person, that will give you a strong base from which to hone your skills.
One key area I suggest you keep in mind is to examine exactly what it is you are doing to your file, and continue to be diligent. Though it may look good on the first file you tried it on, it may not work for every file. For example, when I see “blurry face retouching”, all I can do is shake my head. It’s easy to get so wrapped up with the improvements you’ve made, that you lose sight of the big picture.
After you get knocked back down a peg or two by an objective observer, you learn to identify the bad things you may have created while trying to fix the original bad things in an image. Sometimes, you have to get knocked down multiple times (been there). It’s called experience, and it doesn’t come in a bottle. It helps to develop a thick skin, keep listening to others with an open mind, and continually learn and explore.
When you are just beginning to delve into retouching, many newbies seem to gravitate to the online tutorials, then actions, then plugins. Each can be either good or bad. Even bad tutorials may have one step that you may find useful and there are many good ones. Whenever I have a challenge, it’s the first place I look for answers, and it doesn’t take long to figure out if it’s legit or just somebody who has too much time on their hands and decided to make a video. I have always avoided most Photoshop actions unless I made it myself, (though I may be a bit of an admitted control freak)!
Using Photoshop Actions
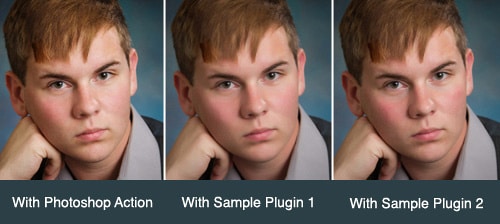
 A Photoshop action is a recorded set of steps applied to an image to automate the editing process. The danger in using actions is that if you didn’t create it with care, you don’t have any idea what it could be doing to your file. Many printing problems are caused by people who have run so many actions, presets, etc, that they couldn’t tell you what all had been done to that file. Thus they have no idea at what point in their editing their file integrity was compromised, resulting in poor print quality. The good thing about actions are they can speed up repetitive steps to make your editing sessions go faster and more effeciently. Actions can be simple, such as a shortcut to save, flatten or apply sharpening to elaborate, combining multiple steps and filters to achieve a look.
There are many software plugins that are being used these days. I’ve always been wary of anything that had an “auto” setting, as I prefer to understand how things work and exactly what they are doing to my file. The plugins or stand alone software give your image and overall softness and can flatten out the facial contours while reducing the redness of blemishes. This can be great for a quick overall softening for proofing or small prints, but I would use it with caution when printing larger portraits. The default settings are just a place to start.
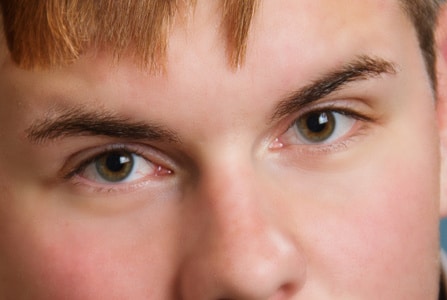
Always keep in mind your biggest output and adjust to maximize your work for that size. With any of the options that boast retouching with the touch of a button, I recommend taking a closer look. A good tip is to check your work zoomed in at 100% to check the quality of your adjustments. Much less costly than paying for a reprint! Many people may find a way to use them at a lower setting, or control how much is ultimately used by utilizing masks in Photoshop or tweak the outcome in some other way to make it acceptable and avoid overretouching the image.
Retouching in Photoshop is simple when you know what needs to be removed and what needs to only be softened for a natural look. The Healing Brush and Clone Stamp tool are the main tools. The use of layer masks can help you control the opacity of your retouching to blend as needed. Adjustment layers are also helpful to apply color or density changes to particular areas, such as reducing the redness of a sunburn, again using layer masks to control the opacity of those changes.
The New Deal
In the olden days (pre-digital) there used to be photographers and retouchers. There were a few studios who did their own retouching, doing traditional artwork on the prints and usually leaving the negative retouching to the labs. While the photographer has always worn many hats, now the digital reign requires the photographer to wear even more, including retoucher, digital artist, darkroom printer, and computer technician. Whether you choose to learn, continue, or delegate your retouching is a choice for each individual, but it remains a topic among many photographers who struggle with all the hats they wear.
So are you donning the retoucher hat along with all the others? Now that Photoshop has become an integral part of most studios, there are few photographers who have not acquired the most basic of Photoshop skills. With the investment of all that software, most photographers feel the need to do their own retouching. However, I see countless posts on Facebook by photographers who are posting late at night, complaining about staying up all night to edit and retouch and just want their life back. Sound familiar?

If you would like more time for shooting and are considering farming out your retouching, I suggest you look for an experienced retoucher. A retoucher with many years of experience can edit a file quickly and effeciently. Ask for a variety of before and after samples so you can judge their skillsand send them a variety of your images to test. But wait, you say, I have developed a “look” that defines my style and preferences. With a little communication, a retoucher that knows what and how much to retouch, can adjust to meet your specifications.
If you are new at doing your own retouching, the best advice I can give is to find someone knowledgable and get their objective opinion on your retouching. While I see a lot of really good retouching from photographers, I also see a lot of bad. Sometimes your customer doesn’t really know what’s wrong with a poorly retouched image, but knows that “it just doesn’t look right.” Your customer’s disatisfaction can be a valuable learning tool, even though the process can be excruciating. Listening to them as they pinpoint what they find amiss will help hone your eye to important details you may be overlooking. It’s like learning to see the difference between density and contrast. It’s helpful when someone can analyze it for you and train your eye what to look for.
Best Practices
So here’s where I reveal my most important tips on checking your own retouching.
1. Always work on a duplicate layer or have all your retouching on another layer. Leave your background layer pristine and untouched. Think of it as your “before” layer.
2. When you are done with your work, Alt click (windows) or Option click (mac) on the eyeball of your background layer in the layers palette. This should toggle between all extra layers off and on. Zoom in at 100% and toggle back and forth to discern whether your retouching has improved the image without introducing bad things such as undesirable patterns. This is also the best way to determine that you have not overretouched. Depending on how many layers you have, you may want to turn off and on each layer to see which layer has the problem on it. At this point you have choices to tweak that layer to make it usable by lowering the opacity, reworking the retouching on that layer, or adjusting the amount of pixels on that layer by masking. I have years of experience at correcting photos and I still do this all the time! It’s just too easy to assume your image looks great without comparing it to the original.
3. Check the following to see if the changes are helping or reducing the quality of your photography. Is the focus consistant through out the image? I’m not talking about depth of field, but about things on the same focal field. For example, make sure the eyes are not overly sharpened, while the skin is smeary. Watch that the effects you have applied have not wiped out contour lines that define the charachter of the face, like the edges of the nose, apples of cheeks or jawline. Have you changed the shape of the face? Are the shadows that shape the facial features changed? Are these changes enhancing while retaining the subjects likeness or are they distracting?
4. Until you have your retouching methods nailed down, have an unbiased person look at your before and after. Sometimes a fresh set of eyes will see obvious points you have overlooked. Or, take a break, work on something else and give it another look before your final output, especially if the work you have done is more complicated.
5. For more tips and assistance with retouching, check out these sites (I’ve also sprinkled links to them throughout this post). The video tutorials are a great way to learn new retouching techniques.
One thing is for sure, there is always something new to learn. Besides utilizing the web for tutorials etc., going to conferences is a great way to learn more. State and National photography conferences will have classes demonstrating a variety of image enhancing techniques and workflows. I find it really helpful to get out of my little cocoon and see how others are doing things and I always learn something. And if you really want to overload your brain, you can’t leave an event like Photoshop World without visions of Photoshop tools dancing through your head. No matter where you are in the learning curve, in this day and age, you have to always continue to learn, because you will never know it all. But we can try!


