How To Prepare Your Photos for Professional Printing
April 16th, 2021
As photographers, our “why” is often linked to our desire to create, get to know people, or share our vision, to name a few. As entrepreneurs and small business owners, though, our primary goal is to not only love what we do but to earn a profit while we do it. A simple way we can earn more from our work is to increase our sales, without increasing the time spent monetizing our work.
You may be thinking; “Sounds great, but HOW?” Along with the tips here on how to prepare your work for professional photo printing and selling, using the integrated labs in a Zenfolio site will save you time while making you money… Allowing you more time to schedule additional events, photo sessions, or spend time with friends and family.
Preparing photos for printing takes a little time to set up, and forethought above and beyond just uploading your photos to your website and hoping the best when it comes to making more sales. By following these recommendations to prepare your images, your work will always look great. Let’s explore how to best present your work for some of the most popular categories such as Wall Art, Prints, and Albums, and make it easy for your clients to press that buy button!
Here are the highlights of my suggested best practices; for the full details, keep reading!
- Image size: 300 ppi is our recommendation for best results, 100 ppi minimum (for Mpix labs)
- Cropping and Aspect Ratio: Allow space around your subjects when shooting and choose products that best match your aspect ratio.
- File types: Major labs print from .JPG files – for the most control over your compression and color settings, it is best to upload this file type.
Image Size For Professional Printing
File size can be one of the most confusing parts of preparing your work for printing. To begin, let’s clear up the difference between dpi and ppi. DPI refers to the number of printed dots contained within one inch of an image printed by a printer. PPI refers to the number of pixels contained within one inch of an image displayed on a computer monitor. Since we’re going over file size quality and how it impacts print sizes, we’re using ppi today.
One of the most common questions we are asked in Customer Support is how large an image should be for the best possible printing result. My answer is always the same….upload the largest resolution and file size you have. All of our labs have a minimum ppi requirement. Mpix uses photo imaging equipment with the minimum required image resolution of 100 pixels per inch, for example. If you offered an 8 x 10 print, the resolution for that image would need to be at least 800 x 1000 pixels. If a photo does not meet these requirements, there is no way to override this condition of purchase. This basic requirement ensures that your client will get a desirable (non-pixelated) finished product.
For the best possible results on a final print, we suggest uploading at no less than 250 pixels per inch- 300 ppi is ideal whenever possible. That same 8 x 10 image file we mentioned, when saved at 300 ppi, would be 2400 x 3000 pixels (image size multiplied by the ppi equals the pixel dimensions!) Also, when working with photo books, images need to be large enough to print between 200 to 300 ppi, because very often images do require a bit of cropping to fit the template.
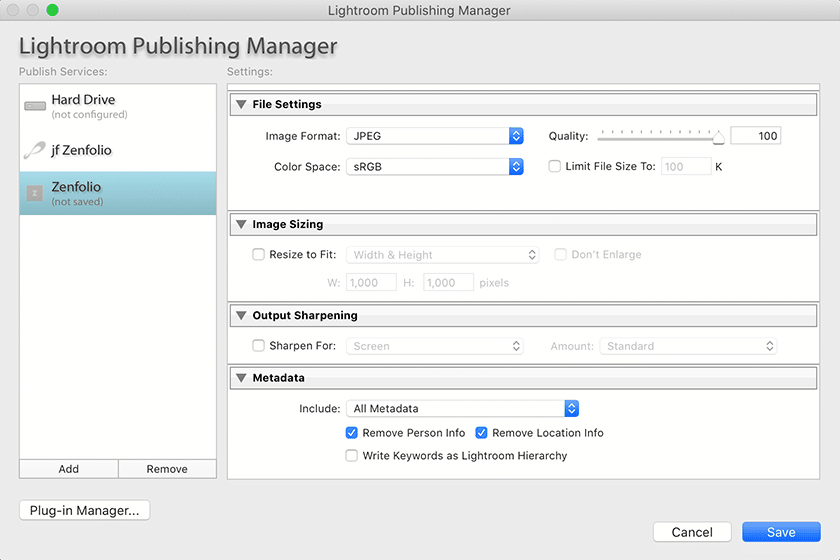
If you are shooting RAW and editing with Lightroom, you can right click on your Publish Services to edit the settings. In addition to setting the ppi at 300, setting the Quality to a higher value will ensure your exported .JPG files will fit the broadest range of print sizes possible. Zenfolio subscriptions can even be used with a special LR plugin, which allows you to publish directly into your account.
One of the very best features within Zenfolio is the ability to set up order approval on your price lists. After your client checks out with their order, this feature allows you to review the photos prior to sending them to print at the lab. Therefore, if a photograph does not quite fit the minimum requirements, you can swap out a larger image during that time.This also allows you to make any changes to crop as well. If you wish to read more about this feature, feel free to do so here.
Cropping and Aspect Ratio
Cropping seems easy enough, but with the immense amount of choices when it comes to print sizes, it is something to consider before uploading them to your website. If a customer enters your store with too many choices, and those choices do not fit the photo, they will get discouraged and could potentially lose all interest in purchasing.
The aspect ratio of your photo compared to the size of print you offer is really key. The aspect ratio of an image is the proportional relationship of the width to the height. Depending on how you crop an image during editing, the print size offered through your price list may mean a loss of some, or even a lot, of the image itself. As a photographer, my own personal style is to shoot very close to the subject. It seems more intimate to me. However, as I branched out into more weddings, I soon learned that shooting that way, especially for groups, was not ideal. If I shot a group photo particularly close, leaving little to no room around the edges, it was next to impossible to offer a large range of print sizes. Forget offering that 8 x 10, one of the most common print sizes purchased, because I left so little room, it cut out the mother in law! (which may or may not be ideal when a bride goes to buy). Giving yourself room as you shoot, allows you to offer more print sizes in different aspect ratios.
Additionally, we always suggest photographers customize their price list so that no matter what size the customer chooses, it will fit the print and eliminate frustration for your client. For example, if you tend to crop some of your edits square (1:1), adding a few square print products to your price list will ensure clients can order those images without losing important details. Cropping out some of the photo may be inevitable, but what is great about Zenfolio is that it allows you to customize the price list for the group, gallery, or sometimes even a single photo, to ensure a great buying experience.
Best File Types For Photo Printing
Some Zenfolio subscriptions allow you to upload several different file types; so what is the best for printing? .Tiff files and .PSD files have less compression or data loss in an image. They are usually larger in size, and allow for a higher resolution. To the trained eye of a photographer, the image may even appear more crisp.
However, when it comes to lab printing (at any major photo lab), the file is converted to .JPG format. This file type optimizes how most people see color as it relates to brightness, resulting in a truly beautiful print. What’s more, technology has come so far that most .JPG files are not as “lossy” as they once were. It is good to keep in mind that this is most evident when the editing is being done to files before they are exported from your editing software – the less you mess with and re-save .JPG files, the less data loss you will see!
We understand fully that, first and foremost, photography is art, and just like any art, it is very subjective. As an artist, using these tips will not only enhance the buying experience for your clients, but also make that register ring! Keep shooting and creating friends!
